Sitecore 10 - all about serialization and the CLI
Sitecore 10 brought us several new functionalities which include a whole new Serialization option! Let's have a look what it is all about.
Serialization?
Serialization is taking an item from the Sitecore Content Tree, saving it on the file system and providing us – the developers – the ability to synchronize it to another Sitecore instance. So, it’s used to move items from our local environment to acceptance and production. As well as to share items between developers.
Reinventing serialization
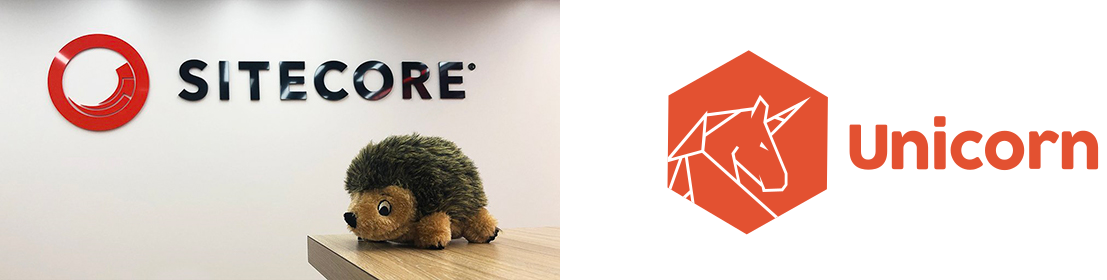
It has only been a year and a few months since Sitecore acquired Hedgehog. A Sitecore partner with a lot of expertise. And they also created a tool that lots of projects use called the Hedgehog TDS tool: Team Development for Sitecore. Which is used for synchronizing items and rebranded to Sitecore TDS.
Another popular tool used for item synchronization is Unicorn.
The new Sitecore Serialization basically combines best of both worlds. Including features from both systems.
Nice to know: With Sitecore 10, you can still use Unicorn. Projects upgrading from a previous version of Sitecore can still be easily migrated to Sitecore 10.
Acronym used by Sitecore is SCS: Sitecore Content Serialization
Defining what needs to be serialized
Let’s go to the technical stuff and dive right into how to define which items to serialize.
Using a default Helix setup, you need to create a module.json file in each foundation, feature or project where you want items to serialize.
Here is an example of a Products.module.json file. And as you can see, this definition is very similar to how Unicorn works.
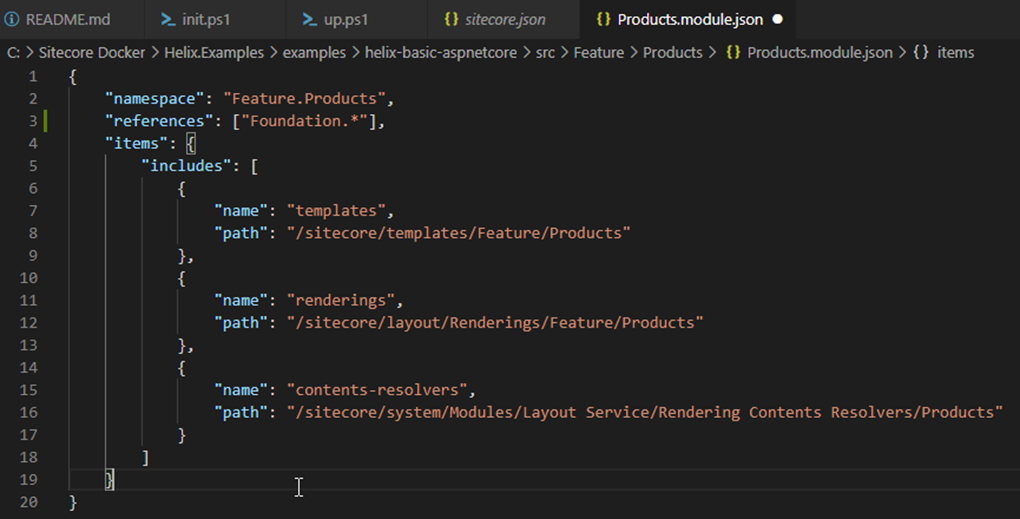
- the namespace is mandatory.
- references are optional and define the dependencies that need to be serialized first. So in this case all Foundation namespaces need to be serialized first.
In this configuration file, you can configure which items to serialize or to not serialize. - the order is very important since the system works on a first-match-wins principle.
All include paths can have their own additional configuration for Scope and Push Operations. These are not mandatory since they both have a default value.
- Scope defines if any child or descendant needs to be included in the serialization. Options are:
SingleItem (default), ItemAndChildren, ItemAndDescendants and DescendantsOnly. - AllowedPushOperations defines what needs to be done during the synchronziation. Options are:
createOnly, createAndUpdate, createUpdateAndDelete (default)
It’s nice to see that Visual Studio Code has intellisense support for the module files. In a few slides I’ll show you how that was made possible.

To further tweak what needs to be included or excluded, you can optionally define rules.
The example shown is taken from the Sitecore documentation website.
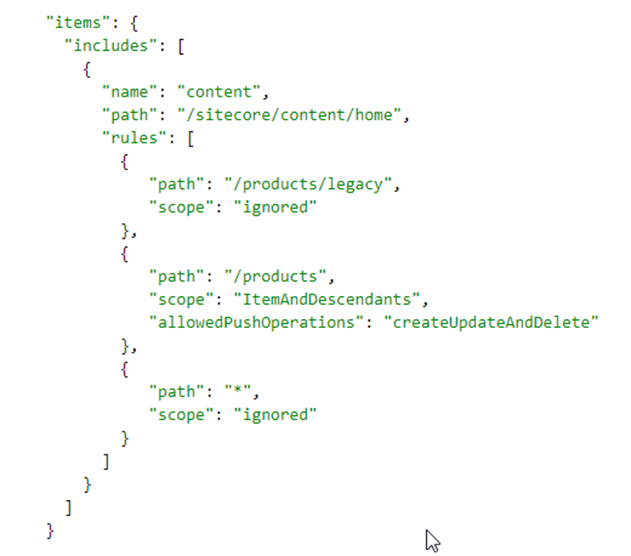
You have 1 include path which has 3 separate rules. Each has a relative path and can define its own scope and allowedPushOperations.
Additionally the scope for a rule, can be set to ignored.
You can see the rules as an if-else statement.
If the path matches /sitecore/content/home/products/legacy, the scope is ignore.
Else, if the path matches /sitecore/content/home/products, the scope is ItemAndDescendants with allowedPushOperations createUpdateAndDelete
Additional info: you can define the database on include level. The documentation states that only master and core are valid values (and master is the default).
Difference with Unicorn YAML
Let's have a look at a serialized item itself. In the screenshot below you have a Hero Banner which I serialized in Unicorn (left) and with Sitecore Serialization (right).
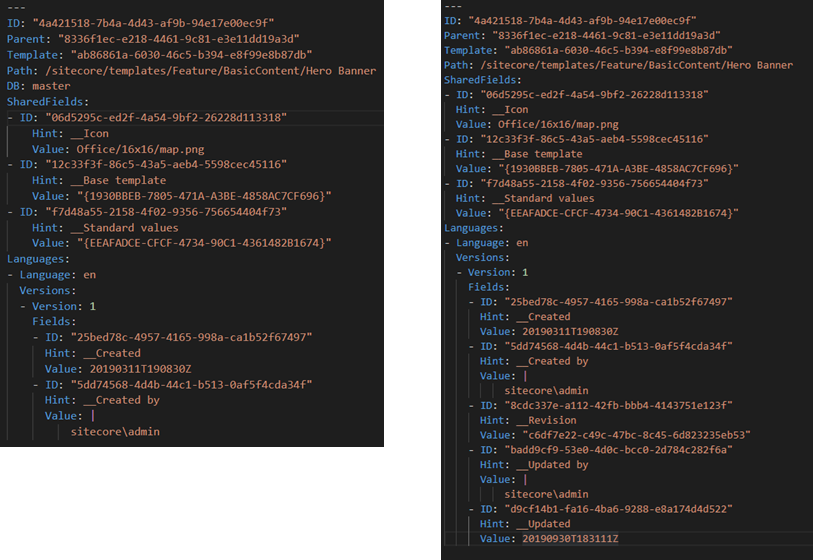
Here on the left you have an example of a serialized item in Unicorn. On the right you have the Sitecore Serialization example. Both are YAML file types (so hasn't changed with Sitecore 10).
No major differences noticed but:
- the Sitecore Serialization file doesn’t have a Database field defined! The database definition is only defined in the module.json files themselves.
- the Sitecore Serialization file does have some default additional serialized fields like Revision id, Updated by and Updated datetime
How can we use Serialization
Ok, so now we know what it does. But how can we use it?
There are 2 options: The Sitecore CLI and a plugin for Visual Studio.
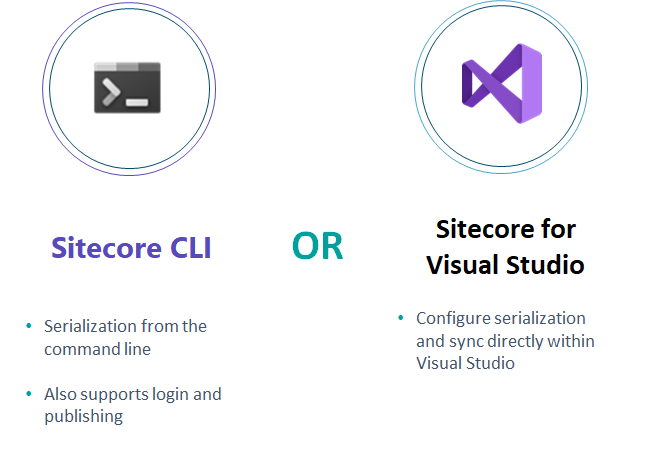
The Sitecore Command Line Interface is a new tool that was created to improve the Developer Experience with Sitecore 10. And specifically, for usage with serializing Sitecore items.
The CLI tool will receive additional functionality in the future. But for now, it can be used for serialization, creating item packages and for publishing. No license is required, you just have to install it and start using it.
So on one side we have the CLI to interact with a Sitecore environment. But there is also a plugin available in Visual Studio itself which you can use, called SVS: Sitecore for Visual Studio.
The only requirement to use SVS is that you have an appropriate license! Which is included with the Sitecore TDS license.
Installing this plugin will provide VS with an additional window called: Sitecore Module Explorer.
A big advantage is that you can use these tools to fetch items from a Sitecore website on another environment. So as a developer, we can more easily fetch items from an acceptance environment for example.
Sitecore Serialization - Installation CM
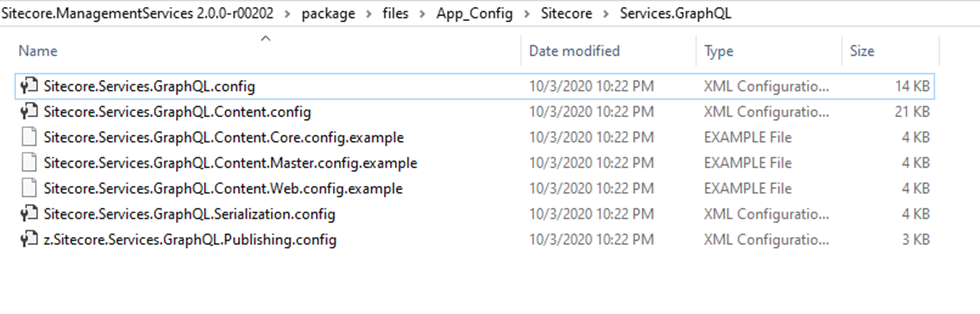
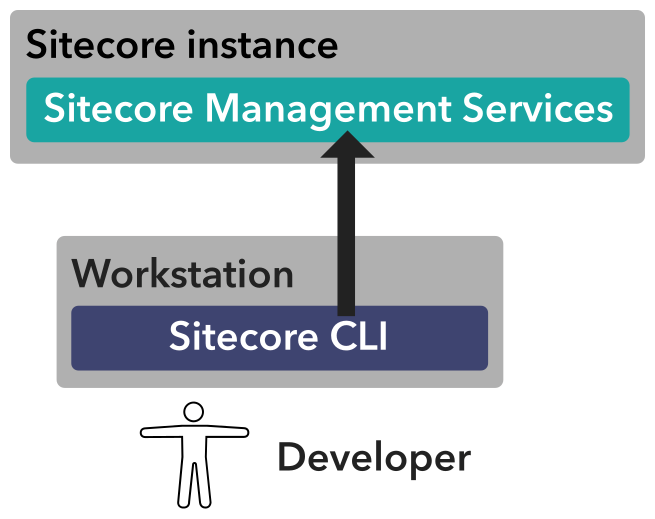
To get started with either the CLI or SVS, you must first download and install the Sitecore Management Services package in your Sitecore Content Management instance.
This will not install any Sitecore items. Its just configuration and dll files.
This installation will provide a GraphQL endpoint to interact with the Sitecore instance. So the CLI and SVS will both use a Sitecore GraphQL endpoint to interact with the Sitecore instance to retrieve item information.
The endpoint has different pages:
baseUrl = https://{sitecore-cm-instance}/sitecore/api/management
- $baseUrl/ui: the graphical client)
- $baseUrl/schema
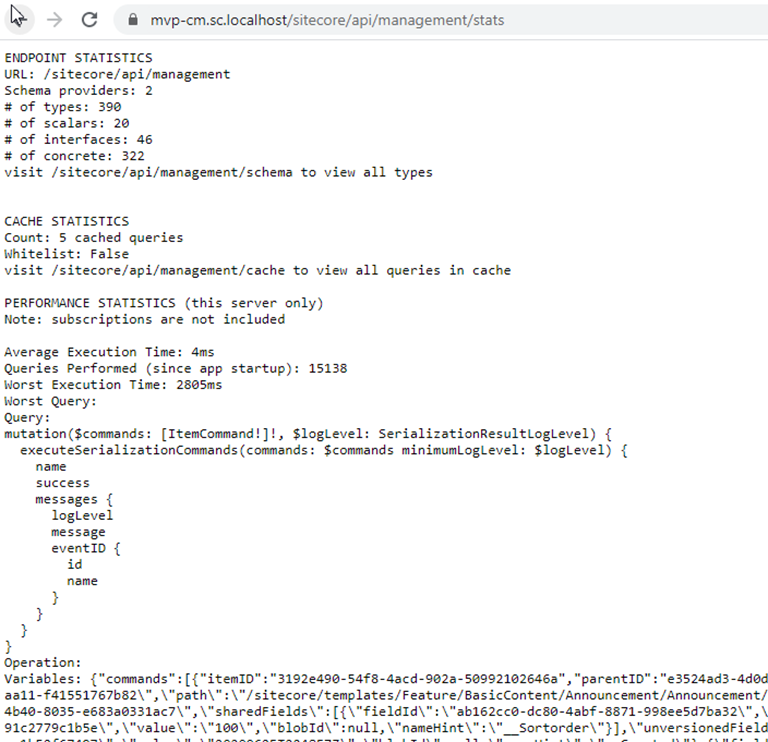
- $baseUrl/stats: shows statistics about the endpoint, its type system and performance
This is the result for the GraphQL stats page.
Which gives you some insights in the execution time for example.
Installation CLI
To get started with the CLI, you must have .NET Core installed. The Sitecore CLI is a .NET Core CLI Tool.
Tools are console applications that are installed from NuGet packages and are invoked from the command prompt.
The steps here are taken from the Sitecore documentation website which is very easy to follow.
- Make sure you have .NET Core installed, the CLI is a .NET Core CLI Tool
- Open PowerShell session
- cd <project folder>
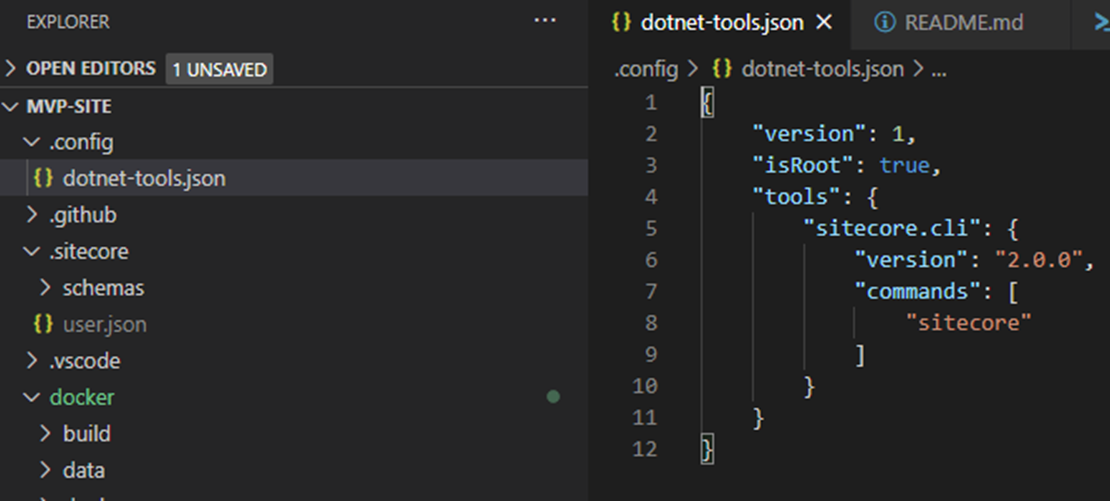
- dotnet new tool-manifest
- dotnet tool install Sitecore.CLI --add-source https://sitecore.myget.org/F/sc-packages/api/v3/index.json
The command dotnet new tool-manifest will create a dotnet-tools.json file in the .config folder. Indicating that this dotnet project uses the sitecore cli tool.
So now you have this setup properly, the Sitecore CLI can be used to talk with the Sitecore Management Services.
Sitecore CLI - available commands
Here is an overview of all the commands currently available in the CLI.
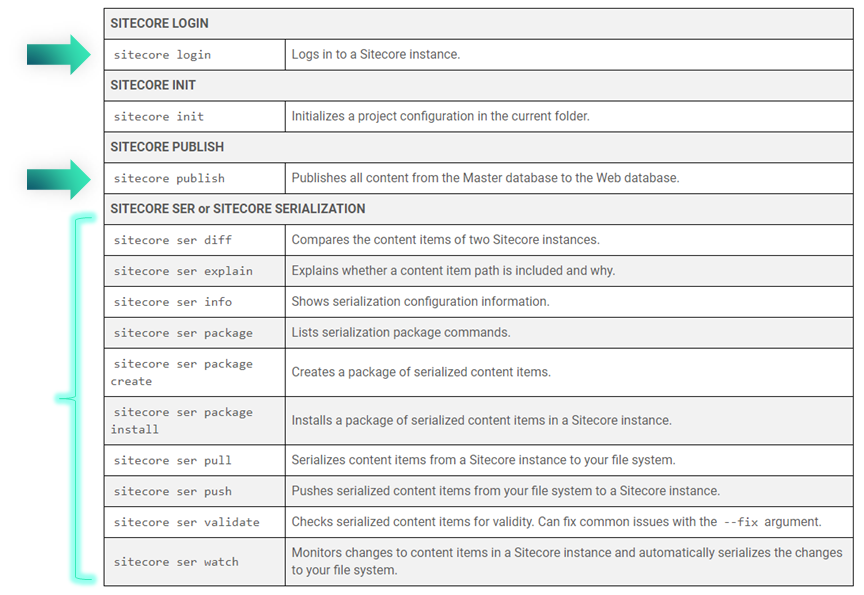
sitecore login will launch a popup where you can login as a user into the Sitecore environment.
Another option is to use client-credentials in the parameters. Which must be configured in the Identity server first.
The latter option can also be used by build & release pipelines - CI/CD - to interact with an environment.
You can use sitecore publish without any parameters to perform a publish on the whole database in all languages. You can specify parameters to control this.
And the biggest section of commands is used for serialization such as fetching, pushing, packaging or even comparing items.
Thesitecore initcommand provides your project with some Schema files.
The example file below is the .vscode/settings.json file which tells Visual Studio Code how to handle the different module files.
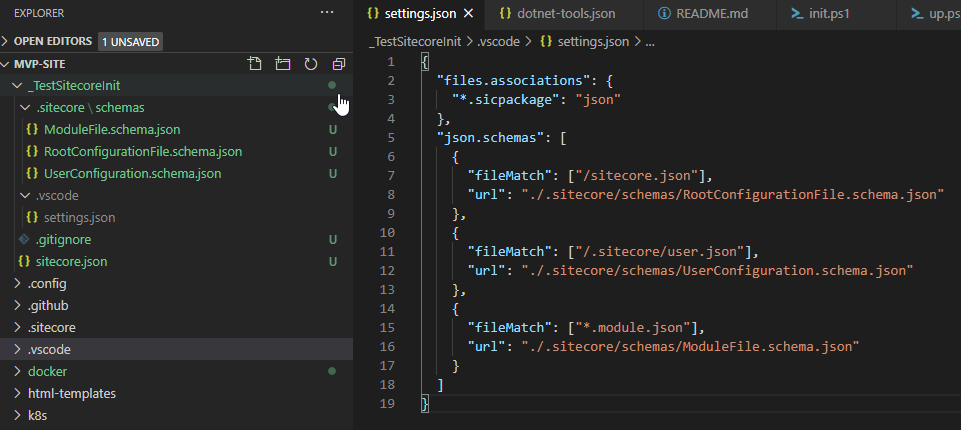
So all files that match wildcard.module.json, must abide to the schema file defined in the url .sitecore/schemas/ModuleFile.schema.json. This provides the ‘intellisense’ in Visual Studio Code when typing!
The sitecore init command also creates a sitecore.json file which defines which module files it should use!
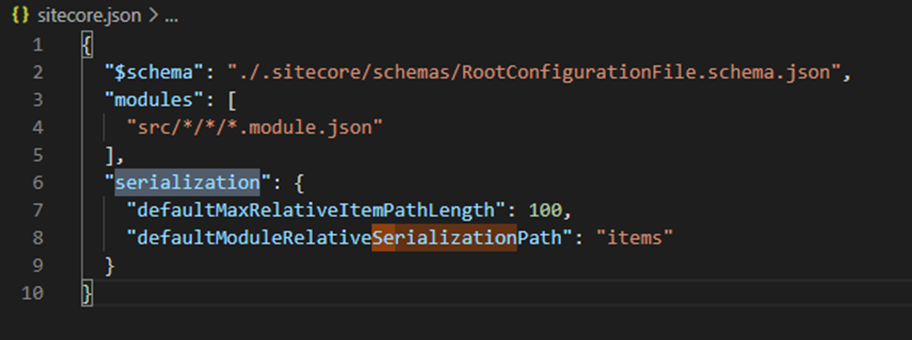
So we’ve come full circle here. I started the information about Serialization about how to configure a module.json file.
You can define the max length which solves the problematic Windows issues regarding paths that are too long.
You also define the serialization path, in this example it is called items. Having this defined, will create a folder in each foundation, feature or project that has a module.json file defined in its root.
When you run the init command, you will have to configure the modules path. By default it will just say TODO.
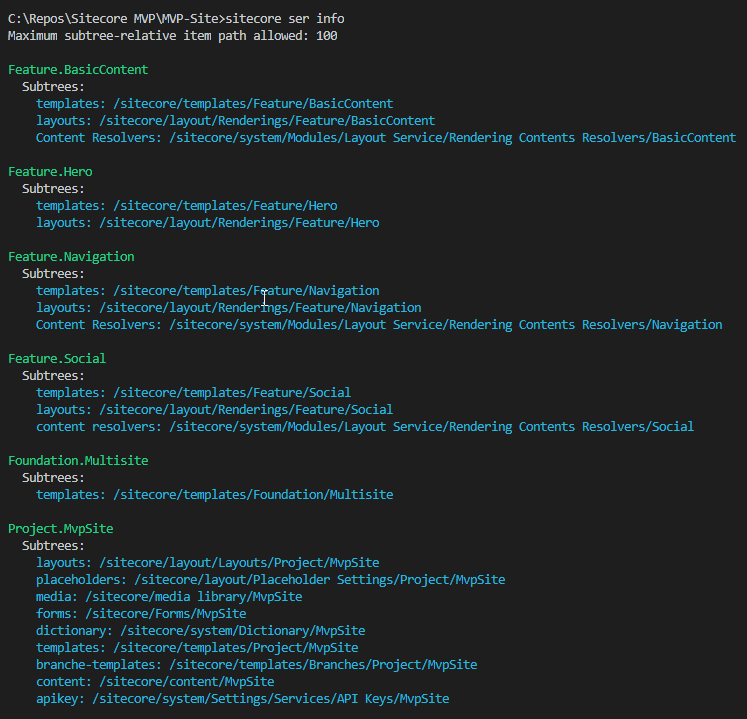
sitecore ser info shows you an overview of all configured module.json files.
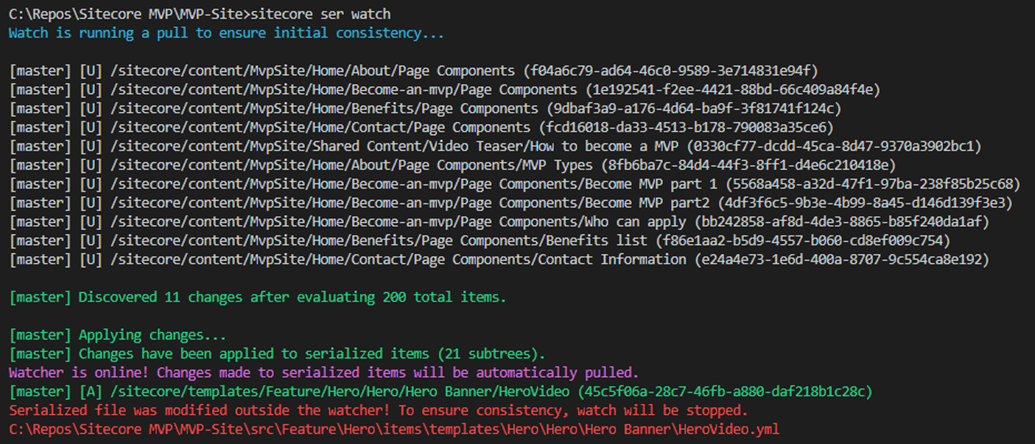
On local environments, you can use sitecore ser watch to automatically serialize changes made in Sitecore to the file system.
Important to know, it is a 1-way watch. Meaning that any change made manually to the YAML files will stop the watcher – if it is running.
Example: deleting a field, updating a field or deleting a yaml serialized file
You need to run sitecore ser push to push your changes to Sitecore. And then run sitecore ser watch again to start the watcher.
Sitecore SVS
I quickly wanted to show a screenshot of the Sitecore plugin for Visual Studio. I’ve installed it myself but haven’t really used it that much yet.
It basically provides the same functionality as the CLI, only more graphical.
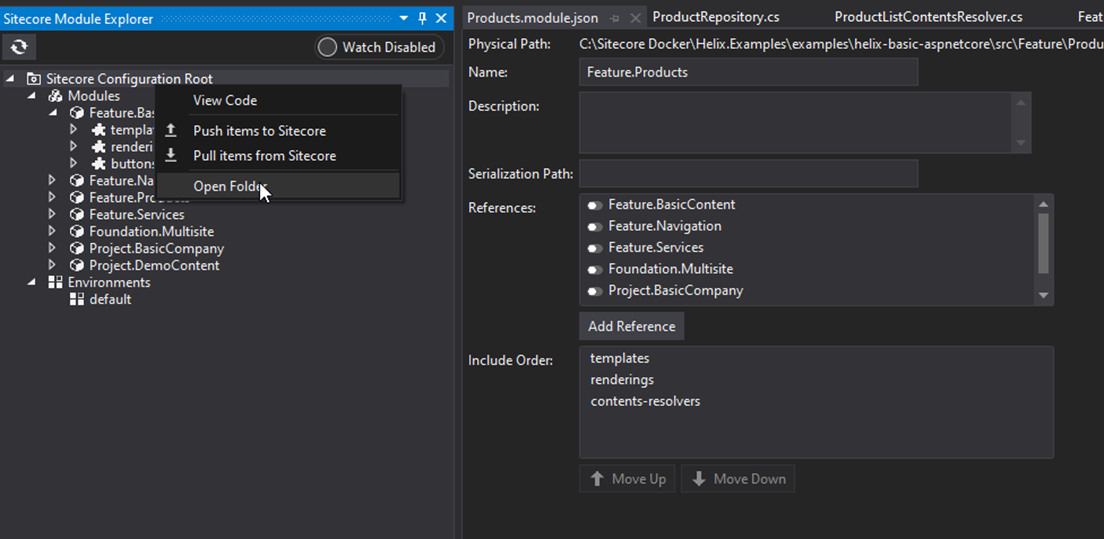
And it uses the same Sitecore GraphQL endpoint for interacting with the Sitecore CM instance.
Installing it will provide VS with an additional window called: Sitecore Module Explorer.
Which allows you to manipulate the configuration of which items need to be serialized. And Pull or Push specific item folders.
On the right side of the screenshot above, you can see an interactive window to manage the module.json files.
A little drawback with the current system is for the Serialization Path, you have to add the path to the Sitecore item manually. There is no easy way to select an item from within Sitecore itself.
SVS will certainly change and get updated later on.
Something that I'm missing
What I’m missing compared to Unicorn: The nice Content Tree messages!

But that is understandable since the configuration of what needs to be synchronized is in your project, and you use the CLI to serialize and fetch the Sitecore items.
You can have different configurations interacting with the same Sitecore instance.
Sources
- Sitecore SCS
https://doc.sitecore.com/developers/100/developer-tools/en/sitecore-content-serialization.html - Sitecore Documention about CLI
https://doc.sitecore.com/developers/100/developer-tools/en/sitecore-command-line-interface.html - https://doc.sitecore.com/developers/100/developer-tools/en/configure-the-relative-serialization-path.html
- Blog post by Volodymyr Hill
https://www.pintle.dk/insights/sitecore-10-sitecore-content-serialization/