Getting started with PowerShell & Sitecore Azure Toolkit - Part 1
Introduction
As most of you know, setting up a Sitecore environment can be done in multiple ways.
For local environments, a lot of people are using the Sitecore Instance Manager (SIM). Which now also has support for Sitecore 9!
Getting a site up and running in Azure, you have 2 options: IaaS and PaaS.
For IaaS, you have to create and provide a Virtual Machine to host the Sitecore website together with several other Azure services / features.
PaaS on the other hand uses Azure WebApps and can be installed through the Azure Marketplace or through ARM (Azure Resource Manager) scripts.
In the Marketplace, search for Sitecore Experience Cloud and then select the right Version, Topology, Size and all other settings.
It also contains a link to help you decide which size you need to choose!
In this article I'm going to show which steps I needed to take to get a Sitecore environment running in Azure by using as much PowerShell that I could in combination with the Sitecore Azure Toolkit which uses ARM scripts for its provisioning.
About Sitecore Azure Toolkit
It contains the tools and resources necessary to prepare and deploy Sitecore solutions to the Microsoft Azure App Service. Exactly what we need!
https://doc.sitecore.net/cloud/working_with_sitecore_azure_toolkit/overview/getting_started_with_sitecore_azure_toolkit
Prerequisites
Lets have a look at the prerequisites first (they are also mentioned in the Getting Started article).
To use the Sitecore Azure Toolkit, you need the following:
- .NET Framework 4.6
- PowerShell version 4.0 or higher. I've used 5.1.
Check your current version by running:$PSVersionTable.PSVersion - Microsoft Azure PowerShell 2.0.1 or later.
Check your current installed versionGet-Module -ListAvailable -Name Azure -Refresh
Or if you are unsure, try runningInstall-Module -Name AzureRM -AllowClobberto update the Azure Resource Manager module. - Microsoft SQL Server Data-Tier Application Framework (DacFX) for SQL server 2012 or later
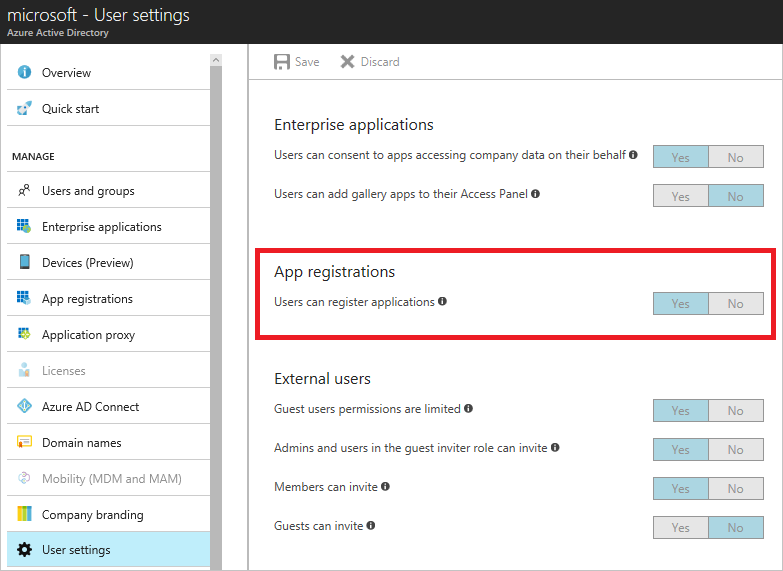
Which is needed for database deployments. Can be installed with Microsoft Web Deploy 3.6 using the Web Platform Installer. - An Azure Subscription and an Azure account that has Administrator rights or an account that can register apps. (Users can register applications should be set to Yes then).
- Cloud-hosted storage for Sitecore WebDeploy packages. An Azure Storage account can be used for this purpose.
I'm going to create the cloud-hosted storage in PowerShell.
For following along with the PowerShell scripts and actually installing a Sitecore environment, you'll also need:
- access to dev.sitecore.net for downloading packages
- a valid Sitecore license file
Import PowerShell AzureRM module
Installing is not enough, in your PowerShell session you will need to import the module too:
Import-Module -Name AzureRM
What we'll do next
Part 2 of the series will focus on setting up some Azure Resources through PowerShell.
- Create an Azure Service Principal that will be used to further execute all PowerShell
- Create an Azure Resource Group
- Create an Azure Storage Account
- Upload the necessary files to the Storage Account
Part 3 will focus on the provisioning of the Sitecore environment itself.
- Create a self-signed certificate for XConnect
- Generate an Azure SAS token so that the Sitecore Azure Toolkit can access the files in the storage account
- Use the Sitecore Azure Toolkit to deploy a complete environment to a specific Azure Resource Group
Some useful references:
- Overview difference IaaS and PaaS:
http://www.nonlinearcreations.com/Digital/how-we-think/articles/2017/07/Sitecore-on-Azure-PaaS-or-IaaS-choosing-the-right-strategy.aspx - Installing and configuring Azure PowerShell:
https://docs.microsoft.com/en-us/powershell/azure/install-azurerm-ps?view=azurermps-5.6.0 - Installing Sitecore through Azure Marketplace:
https://www.valtech.com/blog/step-by-step-guide-to-installing-sitecore-9-on-microsoft-azure-marketplace-module/