Getting started with PowerShell & Sitecore Azure Toolkit - Part 3
This is part of a series.
Go to Part 1 here. Go to Part 2 here.
In part 3, we will provision the Sitecore website in Azure.
Download the ARM templates from GitHub
The Sitecore Azure Toolkit uses ARM templates for the provisioning which can be downloaded from Github.
You only need the templates for the version that you want to install. I'm going for Sitecore 9.0.1 XPSingle.
The README.md file shows you which Azure resources will be provisioned and also contains a list of the parameters you have to set before running the ARM template.
Download and install the Sitecore Azure Toolkit
Sitecore Azure Toolkit is a ZIP package that you can unpack into a folder of the hard drive.
You can download the SAT from dev.sitecore.net: https://dev.sitecore.net/Downloads/Sitecore_Azure_Toolkit.aspx
Unzip it to a location you want.
Then load the Azure Toolkit Module into your PowerShell session
Import-Module .\tools\Sitecore.Cloud.Cmdlets.psm1 -Verbose
Make sure you have the right path. You can also put in the full path if you want.
Configuring the ARM template parameters for Sitecore Azure Toolkit
The ARM template has 2 json files: azuredeploy.json and azuredeploy.parameters.json.
We'll need to update the parameters file! Let's have a look what's inside it:
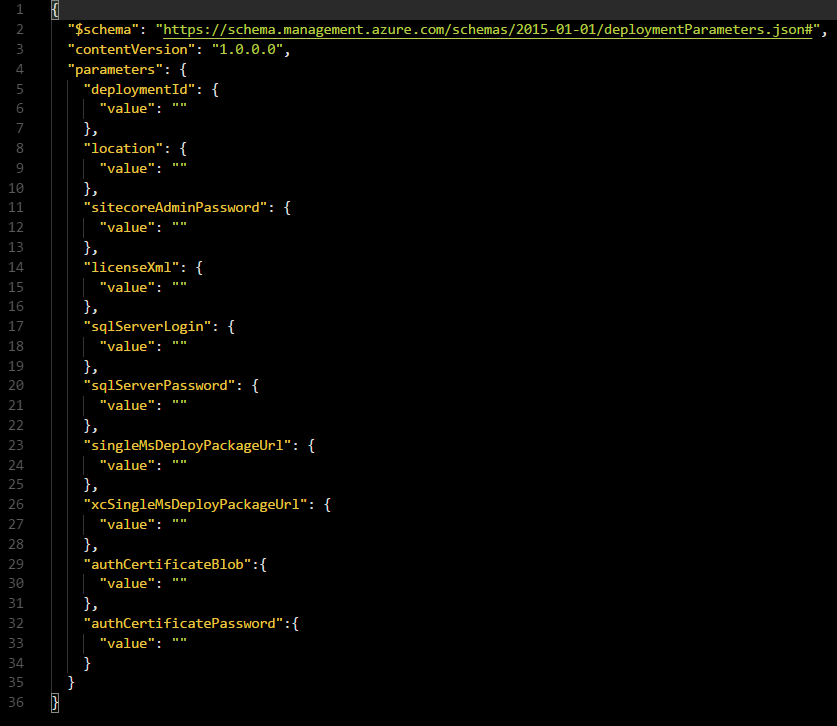
2 parameters will be filled in when we call the SAT script:
The deploymentId and licenseXml parameters in azuredeploy.parameters.json are filled in by the PowerShell script using Name and LicenseXmlPath parameters respectively.
3 parameters are pretty straightforward and every Sitecore developer will know what to fill in here:
- sitecoreAdminPassword: The new password for the Sitecore admin account.
- sqlServerLogin: The name of the administrator account for Azure SQL server that will be created.
- sqlServerPassword: The password for the administrator account for Azure SQL server.
Location is the Azure location where you want to have everything provisioned. I'll use westeurope in my example.
This leaves us with singleMsDeployPackageUrl and xcSingleMsDeployPackageUrl which need to contain the url to the WDP packages that we uploaded to our Azure Storage Blob container.
And also with authCertificateBlob and authCertificatePassword which are necessary to have our sites running on https.
Create a self-signed certificate for XConnect
I created a self-signed certificate for testing purposes. You should use an official certificate for your production websites off course.
This certificate can be created with PowerShell. This is well documented by Sitecore.
The script below will create one in D:\Sitecore\Azure\ folder and will prompt you to fill in a password. This is the same password that you need to fill in for authCertificatePassword!
$thumbprint = (New-SelfSignedCertificate `
    -Subject "CN=$env:COMPUTERNAME @ Sitecore, Inc." `
    -Type SSLServerAuthentication `
    -FriendlyName "$env:USERNAME Certificate").Thumbprint

$certificateFilePath = "D:\Sitecore\Azure\$thumbprint.pfx"
Export-PfxCertificate `
    -cert cert:\LocalMachine\MY\$thumbprint `
    -FilePath "$certificateFilePath" `
    -Password (Read-Host -Prompt "Enter password that would protect the certificate" -AsSecureString)
One important remark, when using a self-signed certificate, you need to extend the azuredeploy.parameters.json file!
The ARM template needs to be aware that you are using a self-signed one and you must explicitly set it to be allowed.
"allowInvalidClientCertificates": {
      "value": true
    }
Generate SAS token for WDP files
To access the WDP files in the storage account, you need to generate an Azure SAS token. When you have that token, you can fill in the 2 remaining parameters: singleMsDeployPackageUrl and xcSingleMsDeployPackageUrl.
What's so special about a SAS token?
SAS stands for Shared Access Signature and provides you with a way to grant limited access to objects in your storage account to other clients, like the Sitecore Azure Toolkit.
You need to specify an interval in which the token is valid and which permission it grants. And optionally an IP address (or range) from which Azure Storage will accept the SAS token.
This gives you a lot of control on when a resource is available.
This script generates a SAS token that is available for 2 hours with the permission read and write.
Note that some variables are used from previous scripts. As long as you are in the same PowerShell session, you'll be able to use them.
$now=get-date
$sasToken = New-AzureStorageContainerSASToken -Name $storageContainerName -Context $storageContext -Permission rl -StartTime $now.AddHours(-1) -ExpiryTime $now.AddHours(2)
A generated SAS token looks like this:
?sv=2015-04-05&sr=c&sig=tu1uXAqpMmtYVpba1SCIRcFnHJcBfIWUJG2GaLFGhOQ%3D&st=2018-04-06T10%3A44%3A05Z&se=2018-04-06T13%3A44%3A05Z&sp=rl
Take the full path of the uploaded WDP package and add your SAS token:
https://{your storage account url}/{your container name}/Sitecore 9.0.1 rev. 171219 (Cloud)_single.scwdp.zip?sv=2015-04-05&sr=c&sig=tu1uXAqpMmtYVpba1SCIRcFnHJcBfIWUJG2GaLFGhOQ%3D&st=2018-04-06T10%3A44%3A05Z&se=2018-04-06T13%3A44%3A05Z&sp=rl
Starting the provisioning
Alright! You should now have everything to start the provisioning.
Update the azuredeploy.parameters.json
Here's my completely filled in json parameter file:
{
  "$schema": "https://schema.management.azure.com/schemas/2015-01-01/deploymentParameters.json#",
  "contentVersion": "1.0.0.0",
  "parameters": {
    "deploymentId": {
      "value": ""
    },
    "location": {
      "value": "westeurope"
    },
    "sitecoreAdminPassword": {
      "value": "thispasswordneedstobegreaterorequalto8"
    },
    "licenseXml": {
      "value": ""
    },
    "sqlServerLogin": {
      "value": "sc_admin"
    },
    "sqlServerPassword": {
      "value": "thisPasswordNeedsToBeComplex!"
    },
    "singleMsDeployPackageUrl": {
      "value": "https://{your storage account url}/{your container name}/Sitecore 9.0.1 rev. 171219 (Cloud)_single.scwdp.zip?sv=2015-04-05&sr=c&sig=tu1uXAqpMmtYVpba1SCIRcFnHJcBfIWUJG2GaLFGhOQ%3D&st=2018-04-06T10%3A44%3A05Z&se=2018-04-06T13%3A44%3A05Z&sp=rl"
    },
    "xcSingleMsDeployPackageUrl": {
      "value": "https://{your storage account url}/{your container name}/Sitecore 9.0.1 rev. 171219 (Cloud)_xp0xconnect.scwdp.zip?sv=2015-04-05&sr=c&sig=tu1uXAqpMmtYVpba1SCIRcFnHJcBfIWUJG2GaLFGhOQ%3D&st=2018-04-06T10%3A44%3A05Z&se=2018-04-06T13%3A44%3A05Z&sp=rl"
    },
    "authCertificateBlob":{
      "value": ""
    },
    "authCertificatePassword":{
      "value": "thisisnotthepassword"
    },
	"allowInvalidClientCertificates": {
      "value": true
    }
  }
}
3 parameters are still empty, we'll pass those in when calling the script.
#SCTemplates contains the path to the azuredeploy.json. Can be a local path (you've downloaded it in a previous step) or an url
$SCTemplates="https://raw.githubusercontent.com/Sitecore/Sitecore-Azure-Quickstart-Templates/master/Sitecore%209.0.1/XPSingle/azuredeploy.json"
#DeploymentId is actually also the Azure Resource Group where you will deploy your environment to. And also the prefix used for every resource that gets provisioned.
$DeploymentId = "your-resource-group"
#Your Sitecore license file
$LicenseFile = "D:\Sitecore\Azure\license.xml"
#The self-signed certificate in this case
$CertificateFile = “D:\Sitecore\Azure\E4CEE030C0ED6C6303DEC6923F0487EF968F3657.pfx”
#Azure location
$Location="westeurope"
#Path to your custom parameters file
$ParamFile="D:\Sitecore\Sitecore-Azure-Quickstart-Templates-master\Sitecore 9.0.1\XPSingle - Modified\azuredeploy.parameters.json"
$Parameters = @{
    "deploymentId"=$DeploymentId;
    "authCertificateBlob" = [System.Convert]::ToBase64String([System.IO.File]::ReadAllBytes($CertificateFile))
}

Start-SitecoreAzureDeployment -Name $DeploymentId -Location $Location -ArmTemplateUrl $SCTemplates  -ArmParametersPath $ParamFile  -LicenseXmlPath $LicenseFile  -SetKeyValue $Parameters
And now the hard part... waiting. It took about 45 minutes to provision this environment.
Resources / further readings:
- Getting started with Sitecore Azure Toolkit:
https://doc.sitecore.net/cloud/working_with_sitecore_azure_toolkit/overview/getting_started_with_sitecore_azure_toolkit - More about SAS:
https://docs.microsoft.com/en-us/azure/storage/common/storage-dotnet-shared-access-signature-part-1 - Quickstart template & sample script:
https://github.com/Sitecore/Sitecore-Azure-Quickstart-Templates