Sitecore 10.1 and Docker: custom solr indexes

Before 10.1
Adding Solr cores in Docker for version 10.0.1 was done by modifying the DockerFile for the solr image, copying your managed schema to it and pass in the core names that you want to have created.
Here is an example from the Sitecore documentation on SXA:
COPY --from=<sxa_image> C:\module\solr C:\sxa_data
RUN C:\Add-SolrCores.ps1 -SolrPath C:\solr -SolrSchemaPath C:\sxa_data\managed-schema -SolrCoreNames 'sitecore_sxa_master_index,sitecore_sxa_web_index'; `
  Remove-Item -Path C:\sxa_data -Recurse -Force;
You can read more information about this on the blog page of Göran Halvarsson: https://visionsincode.com/2020/11/21/add-your-custom-index-to-solr-in-sitecore-docker-like-a-bossgoon/
Difference between solr and solr-init container
With Sitecore 10.1 we not only have a solr container, but also a solr-init one.
- solr: only used for running your Solr Cloud instance in docker
- solr-init: used for initialization, this will create the indexes and then the container will stop
With Sitecore 10.1, solr will - by default - run in Solr Cloud mode with 1 solr node
Adding your custom cores
Well, this boils down to create an additional layer to the solr-init image!
You need to create a custom json file and take this into consideration:
- MUST be in the
C:\datafolder on solr-init - the filename MUST start with the text
cores - the json MUST start with either
sitecoreorxdb
So you must define an array in the json that starts with either sitecore or xdb. This is because the powershell to create the indexes will read the json file and join up all indexes that matches those 2 keywords.
So start by adding a solr-init folder which includes your json file and the Dockerfile.
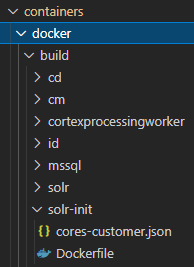
In this example, I created cores-customer.json which contains 2 additional indexes:
{
    "sitecore": [
        "_my_custom_index",
        "_my_other_custom_index"
    ]
}
And my Dockerfile will copy that file to the C:\data folder.
# escape=`

ARG BASE_IMAGE

FROM ${BASE_IMAGE}

SHELL ["powershell", "-Command", "$ErrorActionPreference = 'Stop'; $ProgressPreference = 'SilentlyContinue';"]

COPY cores-customer.json C:\data\cores-customer.json
That is it!
Next is to run docker-compose build --no-cache to build all your custom images. And as soon as solr-init starts, it will create your custom indexes in SOLR.
Some troubleshooting
If you don't see your custom sitecore solr indexes in the data folder, make sure that you first delete all your existing indexes.
As soon as 1 solr index was created which starts with the sitecore prefix, it will not add any other index.
Manually delete all sitecore solr indexes from your data folder.
If you check the log file for the solr-init container, you'll see this:
Sitecore collections are already exist. Use collection name prefix different from 'sitecore'.
Terminal will be reused by tasks, press any key to close it.
> Don't forget that you can always open the SOLR Dashboard: https://localhost:8984/solr
Check your docker-compose.yml file for the right port that is exposed:
  solr:
    isolation: ${ISOLATION}
    image: ${SITECORE_DOCKER_REGISTRY}nonproduction/solr:8.4.0-${SITECORE_VERSION}
    ports:
      - "8984:8983"
What does the solr-init do exactly
The entrypoint for solr-init is the following:
powershell -Command $ErrorActionPreference = 'Stop'; $ProgressPreference = 'SilentlyContinue'; .\\Start.ps1 -SitecoreSolrConnectionString $env:SITECORE_SOLR_CONNECTION_STRING-SolrCorePrefix $env:SOLR_CORE_PREFIX_NAME -SolrSitecoreConfigsetSuffixName $env:SOLR_SITECORE_CONFIGSET_SUFFIX_NAME -SolrReplicationFactor $env:SOLR_REPLICATION_FACTOR -SolrNumberOfShards $env:SOLR_NUMBER_OF_SHARDS -SolrMaxShardsPerNodes $env:SOLR_MAX_SHARDS_NUMBER_PER_NODES -SolrXdbSchemaFile .\\data\\schema.json -SolrCollectionsToDeploy $env:SOLR_COLLECTIONS_TO_DEPLOY"
So by starting this container, you'll run the Start.ps1 powershell script (check my other blog post for the contents of Start.ps1) and will:
- read all cores.json files
- check if sitecore indexes were already created
- get the solrconfig and apply any xslt patching
- create the sitecore cores
- create the xdb cores and update it's schema
Some information on custom schema's
Disclaimer, didn't try it myself but I assume it could be useful for someone. If you try it and it works, let me know please ;-)
Currently only the xdb indexes have a custom schema file applied (and not the sitecore indexes).
This is done in the Start.ps1 script by calling Update-Schema.ps1.
If you want to use custom schema's yourself, you will probably need to:
- copy your schema to the solr-init in the DockerFile
- copy a custom Start.ps1 script that includes your changes for the schema to be applied
- overwrite the entrypoint to run your custom Start.ps1 script
Don't forget... populate your SOLR schemas!
Another important difference between Sitecore 10.1 and previous versions of Docker is that the solr-init script will not automatically populate your Solr schema's.
- An easy way is to populate them manually. See Sitecore documentation for info on this:
https://doc.sitecore.com/developers/101/platform-administration-and-architecture/en/solr-managed-schemas.html - Another option is to use the Sitecore CLI for this. An example can be found in the Helix Examples on Docker: https://github.com/Sitecore/Helix.Examples/blob/develop/examples/helix-basic-aspnetcore/up.ps1#L48-L51