 Koen Heye Blog
Practical SitecoreAI Extensions, part 1: Google PageSpeed Insights

🎄 This is part 1 of 3 of a proof of concept I wrote for the Sitecore Community Advent Calendar 2025, where it was published as one post on 15 December 2025.
This series:
- Part 1: Google PageSpeed Insights (this post)
- Part 2: Mouseflow
- Part 3: Atlassian Confluence
Since Sitecore announced SitecoreAI Marketplace, I've been wondering what kind of useful extensions we can create. Extensions that actually increase our users day-to-day productivity or just make it easier for them to use it.
For a client I'm working for, I asked which software or tools the marketing department uses regularly. These were mentioned:
- Google Pagespeed
- Mouseflow - mainly for page heatmap functionality of certain pages on a website
- Atlassian Confluence for documentation
- their DAM environment to move images to their website
Summary of this blog
We'll have a look at the Sitecore Marketplace and then delve into 3 solutions setup as a POC to show the kind of integrations that are possible. We'll also show some functionality of the product design system that Sitecore has in beta right now: blok.
What are Sitecore Marketplace extensions?
Before diving into the created solutions, let me introduce you to what the Sitecore Marketplace actually is. You'll find all information on the well structured Sitecore Developer documentation website. So this section is more of a summary and if you know what it does, please skip to the next heading.
General info
Sitecore Marketplace is the home for extending and customizing Sitecore digital experience platform (DXP) products.
It is meant to add new capabilities to Sitecore. Something I as a developer have been missing for a few years since Sitecore XM Cloud was introduced.
The ability to be able to use custom fields again will really improve the overall flexibility of SitecoreAI.
Extension points
There are 5 integration points:
- As a Standalone on the Cloud Portal dashboard
- 4 in SitecoreAI itself:
- as full-screen;
- in the Page builder context panel;
- in the Page builder custom field;
- or as a Dashboard widget.
Getting started
A great resource for getting started with development is this introductory video by Rob Earlam:
This video encapsulates the bare minimum you need to know about developing for the Sitecore Marketplace and will also explain the integration points.
For all examples below, I started from the Marketplace Starter kit repository on GitHub for my own app developments. It is easy to understand and will definitely kick-start your development as well.
My challenge
I wanted to come up with a solution for at least 3 tools. Trying to integrate them into SitecoreAI. Even though not every integration will be fully optimized, the focus of this side project was bilateral: getting insights into working with the Marketplace starter kit and SDK and showcasing business & marketing that you can extend SitecoreAI easily. And on top of that, learning some react!
Warning: I'm no react developer. I spent a lot of time trying and testing code, rewriting and searching on how to do things. I wanted to make it work first. Before getting worried about performance and optimization. Please bear this in mind when checking out code in this blog post. If you notice something that is blatantly wrong, or code that can be improved ... or just want to say hi; please reach out to me through LinkedIn.
I'm trying to provide useful information and I'm doing this by splitting things up in steps. This also helps me to document and structure this process. Especially since I really had to go back and forth with trial and error to get things to work.
Only interested in the results?
Go to these sections:
- Google Pagespeed integration summary
- Mouseflow integration summary
- Atlassian Confluence integration summary
- Overall conclusion
Google PageSpeed Insights (PSI)
Regularly checking the performance of your website is something that should be done automatically.
I had several ideas for an integration. Since this was my first dabble around in what is possible, I looked at the easiest implementation.
Some of the ideas:
- request PageSpeed Insights on demand.
- have an overview of a few key pages with historical results
- ability to compare PageSpeed with different versions of a page (before / after result with published changes)
If you don't know Google PageSpeed, this is what it is:
It is a free tool that analyzes the performance of a webpage on both mobile and desktop devices. It provides a score, metrics, and actionable recommendations for improving a site's speed and user experience, using both real-world (field) data and lab data. - https://developers.google.com/speed/docs/insights/v5/about
I also recommended to have a look at the integration with Google Analytics provided by Sitecore. This also shows you a great example of how an integration can work!
- https://github.com/Sitecore/marketplace-google-analytics
- https://www.youtube.com/watch?v=DA07lRVfEqg
For the Google PageSpeed integration, I used several blog posts describing how to use this and examples of the code were partially copied. Sources can be found at the bottom of this blog.
Step 0: Extension point starter
We'll start from the integration point that lists data inside of the site dashboard: dashboard-widget-extension. Which currently lists Application context data.
Step 1: Create API key from Google Cloud Console
Just follow the documentation on the Get-Started page of Google!
Get Started with the PageSpeed Insights API | Google for Developers
- Go to your Google Cloud Console.
- Create a new project or select an existing one.
- Navigate to the APIs & Services section.
- Enable the PageSpeed Insights API.
- Generate an API Key from the Credentials tab.
Step 2: environment variable
Define the API key in the .env file:
PAGESPEED_API_KEY=your-API-keyStep 3: define a type
We'll define an interface that can hold all the data we want to show on the page.
File created: src/types/Metrics.ts
export interface Metrics {
  performance: number;
  accessibility: number;
  bestPractices: number;
  seo: number;
  fcp: string;
  lcp: string;
  tbt: string;
  cls: string;
}
Step 4: define a component
A Function Component (FC) is what we'll use on the page to display our metrics data. Combined with the react chartjs 2 library for displaying the data in a nicer way.
File created: src/components/metricschart.tsx
We want to show the performance, accessibility, best practices and SEO as a bar chart. And the fcp, lcp, tbt, cls as a doughnut together with the results in a plain old unordered list.
import { FC } from 'react';
import { Bar, Doughnut } from 'react-chartjs-2';
import { Metrics } from '../types/metrics';
import {
  Chart as ChartJS,
  CategoryScale,
  LinearScale,
  BarElement,
  ArcElement,
  Tooltip,
  Legend,
} from 'chart.js';

ChartJS.register(CategoryScale, LinearScale, BarElement, ArcElement, Tooltip, Legend);

interface Props {
  metrics: Metrics;
}

const MetricsChart: FC<Props> = ({ metrics }) => {
  return (
    <div style={{ display: 'flex', gap: '2rem', alignItems: 'flex-start' }}>
      <div style={{ flex: 1 }}>
        <Bar
          data={{
            labels: ['Performance', 'Accessibility', 'Best Practices', 'SEO'],
            datasets: [
              {
                label: 'Scores',
                data: [
                  metrics.performance,
                  metrics.accessibility,
                  metrics.bestPractices,
                  metrics.seo,
                ],
                backgroundColor: ['#4caf50', '#2196f3', '#ff9800', '#9c27b0'],
              },
            ],
          }}
          options={{ responsive: true, plugins: { legend: { display: false } } }}
        />
      </div>
        {/* <div style={{ marginTop: '2rem', display: 'flex', gap: '2rem' }}> */}
      <div style={{ flex: 1, height: '300px', width: '300px' }}>
        <Doughnut
          data={{
            labels: ['FCP', 'LCP', 'TBT', 'CLS'],
            datasets: [
              {
                data: [
                  parseFloat(metrics.fcp),
                  parseFloat(metrics.lcp),
                  parseFloat(metrics.tbt),
                  parseFloat(metrics.cls),
                ],
                backgroundColor: ['#03a9f4', '#e91e63', '#ffc107', '#8bc34a'],
              },
            ],
          }}
        />
        </div>
        <div style={{ flex: 1, height: '300px', width: '300px' }}>
        <ul>
          <li><strong>First Contentful Paint:</strong> {metrics.fcp}</li>
          <li><strong>Largest Contentful Paint:</strong> {metrics.lcp}</li>
          <li><strong>Total Blocking Time:</strong> {metrics.tbt}</li>
          <li><strong>Cumulative Layout Shift:</strong> {metrics.cls}</li>
        </ul>
      </div>
    </div>
  );
};

export default MetricsChart;
Step 5: Define our server side API endpoint
We know what to display, but we do not have a way to fetch the data yet. Let's create the api endpoint on our react server that will call the Google PageSpeed api.
File created: src/app/api/pagespeed/route.ts
This route has a GET function that receives the url to seach for through the url passed in as querystring.
Some things you need to know about this code:
- We'll fetch the UrlSearchParams from the request (reg.url). And then get the url value. I'm repeating this here since it can be confusable. The route url that gets called will be for example this: https://localhost:3000/api/pagespeed?url=www.yoursite.com searchParams.get('url') will result in: www.yoursite.com in the const url.
- you can use console.log(API_KEY) to verify that the key is getting fetched
- you need to specify what data you want to receive from PSI. That is why these querystring parameters are being passed: category=performance&category=accessibility&category=best-practices&category=seo`
// src/app/api/pagespeed/route.ts
import { NextRequest } from 'next/server';
import axios from 'axios';
import { Metrics } from '@/src/types/metrics';

export async function GET(req: NextRequest) {
  const { searchParams } = new URL(req.url);
  const url = searchParams.get('url');
  const API_KEY = process.env.PAGESPEED_API_KEY;

  if (!url) {
    return new Response(JSON.stringify({ error: 'Missing URL' }), { status: 400 });
  }

  try {
    const response = await axios.get(
      `https://www.googleapis.com/pagespeedonline/v5/runPagespeed?url=${encodeURIComponent(url)}&key=${API_KEY}&category=performance&category=accessibility&category=best-practices&category=seo`
    );

    const lighthouse = response.data.lighthouseResult.categories;
    const audits = response.data.lighthouseResult.audits;

    const metrics: Metrics = {
      performance: lighthouse.performance.score * 100,
      accessibility: lighthouse.accessibility.score * 100,
      bestPractices: lighthouse['best-practices'].score * 100,
      seo: lighthouse.seo.score * 100,
      fcp: audits['first-contentful-paint'].displayValue,
      lcp: audits['largest-contentful-paint'].displayValue,
      tbt: audits['total-blocking-time'].displayValue,
      cls: audits['cumulative-layout-shift'].displayValue,
    };

    return new Response(JSON.stringify(metrics), { status: 200 });
  } catch (error) {
    return new Response(JSON.stringify({ error: 'Failed to fetch PageSpeed data' }), { status: 500 });
  }
}
Step 6: Bringing it all together
We need a page.tsx file to actually have our widget in SitecoreAI.
Created file: src/app/dashboard-widget-pagespeed/page.tsx
To keep things as simple as possible for this first attempt of mine to use Sitecore Marketplace, I used an input field where you need to fill in the url of the website you want to have PageSpeed info on. This is definitely something that has room for improvement. Eg. fetch several pages each time dashboard is opened, report on progress in PageSpeed results (and store this data in Sitecore), mark a page as 'needs follow up' to see changes in published versions impact the pagespeed.
The code here is rather straightforward. We have a handleFetchMetricsByUrl function that will call our api endpoint the the url parameter passed in from an input field.
And what we display is:
- a title
- input field
- button with an onClick registered to fetch data
- a MetricsChart component
"use client";

import { useEffect, useState } from "react";
import { useMarketplaceClient } from "@/src/utils/hooks/useMarketplaceClient";
import { ApplicationContext } from "@sitecore-marketplace-sdk/client";

import MetricsChart from '../../components/metricschart';
import { Metrics } from '../../types/metrics';

export default function GooglePageSpeed() {
  const { client, isInitialized, error } = useMarketplaceClient();
  const [appContext, setAppContext] = useState<ApplicationContext>();

  const [url, setUrl] = useState<string>('');
  const [metrics, setMetrics] = useState<Metrics | null>(null);
  const [loading, setLoading] = useState(false);

  const handleFetchMetricsByUrl = async (url: string) => {
    setLoading(true);
    try {
      const response = await fetch(`api/pagespeed?url=${encodeURIComponent(url ?? "")}`);
      const data: Metrics = await response.json();
      console.log("In handleFetchMetricsByUrl", data)
      setMetrics(data);
    }
    catch(err){
      console.error('Error fetching metrics:', err);
    }
    finally{
      setLoading(false);
    }
  }

  useEffect(() => {
    if (!error && isInitialized && client) {
      console.log("Marketplace client initialized successfully.");
      // Make a query to retrieve the application context
      client.query("application.context")
        .then((res) => {
          console.log("Success retrieving application.context:", res.data);
          setAppContext(res.data);
        })
        .catch((error) => {
          console.error("Error retrieving application.context:", error);
        });
    } else if (error) {
      console.error("Error initializing Marketplace client:", error);
    }
  }, [client, error, isInitialized]);

  return (
    <div>
      <h1>📊 PageSpeed Insights Dashboard</h1>
      <input
        type="text"
        placeholder="Enter website URL"
        value={url}
        onChange={(e) => setUrl(e.target.value)}
        style={{ width: '300px', marginRight: '1rem' }}
      />
      <button onClick={() => handleFetchMetricsByUrl(url)}>Analyze</button>

      {metrics && <MetricsChart metrics={metrics} />}
    </div>
  );
}
Google PageSpeed integration summary
I got an integration working with Google PageSpeed, allowing you to display some metrics. Which was the point, so I'm happy.
What can be improved:
- Results aren't saved (no history)
- I used an input field. This component could also be dependent on configuration in Sitecore to fetch the results from a fixed list of pages or can be manipulated with additional functionality in SitecoreAI.
- Perhaps use a different integration point to show results on a page detail as well.
Screenshots of working example
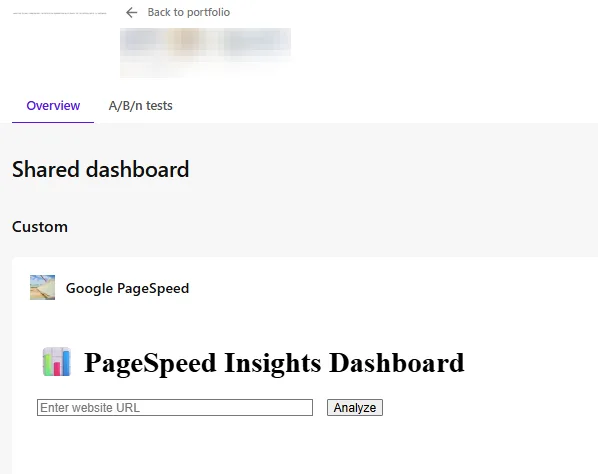 App when shown on the dashboard
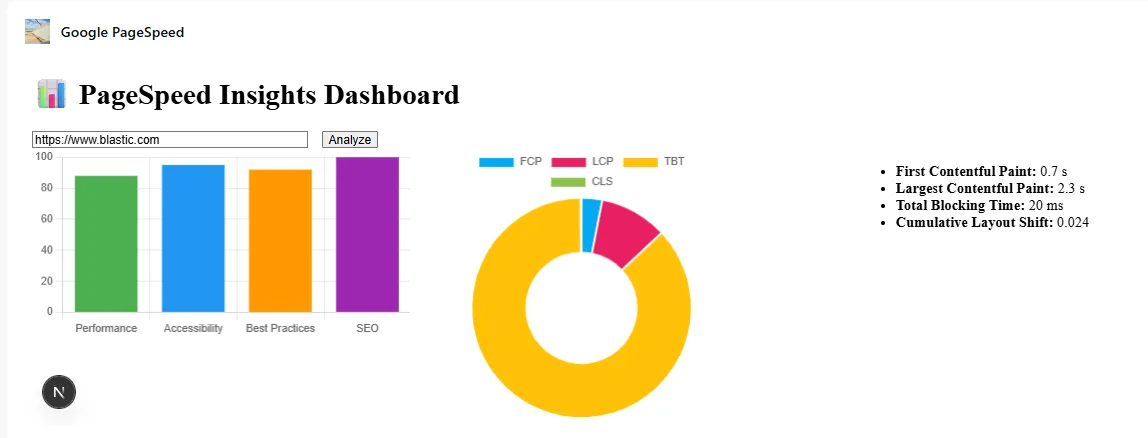 App showing the results when filling in a url
Next: part 2, Mouseflow.
Useful references
Sitecore
- Marketplace Starter kit: https://github.com/Sitecore/marketplace-starter
- Discover Sitecore Youtube channel: https://www.youtube.com/@DiscoverSitecore
- Marketplace Google Analytics extension: https://github.com/Sitecore/marketplace-google-analytics
- Marketplace SDK with GraphQL queries: https://doc.sitecore.com/mp/en/developers/sdk/latest/sitecore-marketplace-sdk/make-a-graphql-query.html
- Product Design Library: https://blok.sitecore.com/beta
Google PageSpeed
- Getting Started: https://developers.google.com/speed/docs/insights/v5/get-started
- Good information on the structure: https://dev.to/addyosmani/monitoring-performance-with-the-pagespeed-insights-api-33k7
- Integration guide examples: https://www.jasminedirectory.com/blog/pagespeed-insights-api-integration-guide/
React basics
- useEffect() explained: https://dmitripavlutin.com/react-useeffect-explanation/
- Components / Functions / Hooks explained: https://medium.com/@dan_abramov/making-sense-of-react-hooks-fdbde8803889
- React Function Components: https://dev.to/elhamnajeebullah/react-typescript-what-is-reactfc-and-why-should-i-use-it-4029
- React ChartJS 2 library: https://react-chartjs-2.js.org/